
What’s the point of using smart, online forms in your recurring workflows if you still have to manually update your database(s) with information from completed forms?
That’s an unproductive use of resources and time, prone to transcription errors.
With frevvo’s Database Connector, you can easily save data from HTML forms to your SQL database, improving your productivity and data validity.
Let’s lay out exactly how you can use the Database Connector to connect online forms to your SQL database.
Start reading below, or jump right to a section:
- frevvo’s Database Connector: An Overview
- So How Do I Connect My HTML Form to My Database?
- Use Case: Create a New Order
- Use Case: Create/Update Records
- Use Case: Insert Multiple Records
frevvo’s Database Connector: An Overview
This is a fairly technical article that contains SQL queries, JavaScript, etc.
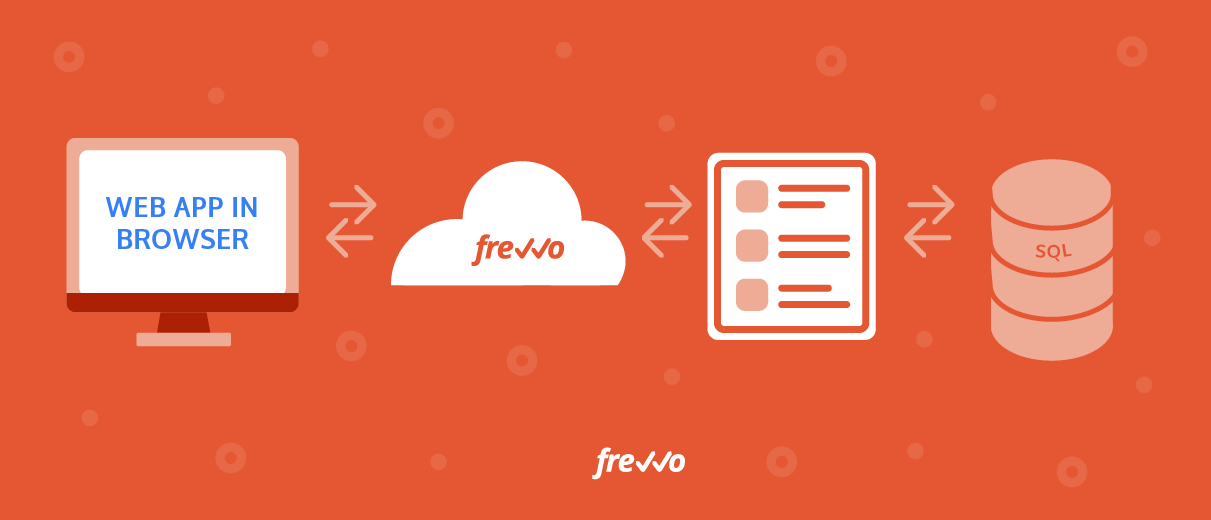
Frevvo’s RESTful Database Connector uses Extensible Markup Language (XML) and JavaScript Object Notation (JSON) to connect your HTML forms and your SQL database via a secure HTTPS connection.

frevvo handles all data transformations – JSON, XML, SQL – for you in both directions: HTML form to database and database to form.
A SQL query may return a single row or multiple rows, each with many columns. Thanks to the Database Connector, the form will automatically update to show you the information relevant to your request – in an easily readable format.
In reverse, the DB Connector will “translate” data from JSON or XML to SQL to keep the database happy.
Integrating your forms and databases using frevvo’s connector means:
- Less data entry (and more productivity)
- Fewer errors and omissions
- Automated connection pooling, retries, etc.
- Protection against SQL injections and other attacks
- Complex queries such as SQL joins
- Encrypted connections for higher security
- Rapid implementation with minimal coding
We’ve already discussed how you can use the Database Connector to auto-populate forms from a database. Let’s take a closer look at how it works in reverse.
So How Do I Connect My HTML Form to My Database?
Note: The following steps require a frevvo account. You can sign up to try frevvo for free for 30 days.
With frevvo, the steps are straightforward:
- Install the Database Connector.
- Configure the Connector using SQL or Stored Procedures.
- Generate form controls from the configured queries. (No coding required.)
- Arrange form controls in frevvo’s drag-and-drop form designer.
- Connect forms/workflows to queries using URLs exported by the Database Connector.
Once you’ve configured your Database Connector, you can test it by following along with this example:
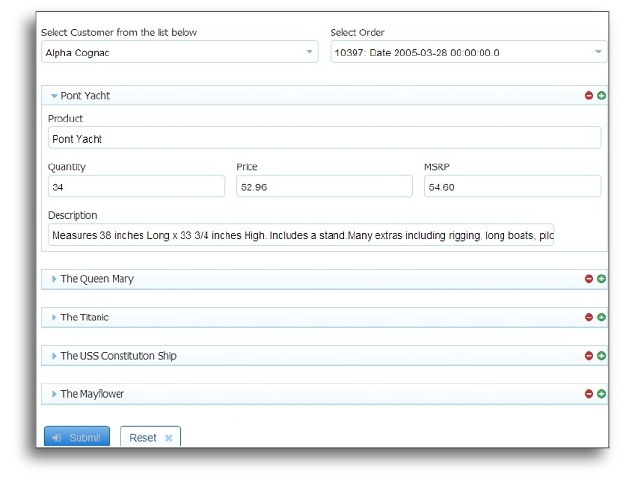
Use Case: Create a New Order
In this example, we’ll examine a simple use case of submitting an order form to the database. Using this form, you can capture customer orders and automatically save them to the SQL database.
1. Define Queries
We will define two queries. The first one creates an order. In addition to the usual <retrieve> operation, this query also has a <create> operation.
<query name="createOrder">
           <retrieve>
               <statement>
                   SELECT orderNumber as onum, customerNumber as cnum from Orders
                   WHERE orderNumber=10100</statement>
           </retrieve>
           <create>
               <statement>INSERT into Orders (orderNumber,orderDate, requiredDate, status,customerNumber)
                   VALUES ({onum}, Now(), Now(), 'In Process', {cnum})
               </statement>
           </create>
       </query>
Let’s examine this query.
We specify a <retrieve> operation (SELECT statement) in order to generate an XML schema/form controls. When the form is submitted, Live Forms generates an XML document for those controls. The XML document is used to execute the <create> operation, which INSERTs the data. We have simply hard-coded a known order number for the example, but you can use any query that generates a result set with the desired columns.
Note that we’ll just insert the current date as the order date and required date for this example. You can easily customize the query to add a date of your choice. If you want the date to come from the form, you must add it to the SELECT statement so that a control is generated in the form. Dates/Times tend to be database-specific.
The second query is simply used to generate an order number.
<query name="getOrderNumber">
            <retrieve>
                <statement>SELECT max(orderNumber) + 1 as onum FROM Orders</statement>
            </retrieve>
        </query>
Once again, this is an oversimplification for tutorial purposes. In practice, order numbers might be generated by the outer application rather than the database.
2. Generate XML Schema
In your browser, go to the relevant URL for your database connector, e.g. http://localhost:8082/database/BIRT/createOrder/schema. Save the resulting XML schema file to disk.
Edit the file. Due to a current limitation in the database connector, the generated schema needs to be edited. Remove the maxOccurs=”unbounded” attribute from the row element declaration. Replace:
<xsd:element maxOccurs="unbounded" name="row">with
<xsd:element name="row">Finally, upload the schema to Live Forms. See Data Sources for instructions.
3. Create the Form
- Create a form and configure it using the drag-and-drop dynamic form builder. (Here are some detailed instructions on getting started.)
- In the properties panel on the left, open the Data Sources pane by clicking on it.
- Click ‘New from XSD’.
- You should see your schema in the resulting dialog box. Expand it and add the ‘createOrder’ element to the form by clicking the + icon next to it.
- Close the dialog box by clicking ‘X’ in the top right corner.
- In the Data Sources pane, expand the createOrder data source by clicking on the + icon to the left.
- Click the + icon next to the row element. Live Forms will generate controls in the form.
- You can drag and drop to rearrange as you wish.
- Rename the Section named ‘Row’ to ‘Order Info’.
This step generates controls that are bound to the createOrder data source by Live Forms. You can render the controls as you wish but Live Forms will always generate an XML document conforming to the XML schema above.
Create a business rule
- Click the ‘Rules’ button in the toolbar at the top of the Form Designer.
- Click + to create a new rule and the ‘Edit’ button to open the rule.
- Set the Name to ‘Copy customer number and generate an order number’.
In the ‘Rule’ text area: copy and paste the following:
/*member onum, resultSet */
if (sc.value.length > 0) {
  cnum.value = sc.value;
  eval ('x=' + http.get('http://localhost:8082/database/BIRT/getOrderNumber'));
  onum.value = x.resultSet[0].onum;
}
Let’s analyze this rule.
- if (sc.value.length > 0) – this implies that the rule will execute when the select customer drop down has a value and the value changes.
- cnum.value = sc.value; simply copies the customer number into the cnum control.
- eval (‘x=’ + http.get(‘http://localhost:8082/database/BIRT/getOrderNumber’)) – this gets an order number HTTP GET.
- onum.value = x.resultSet[0].onum; copies the order number from the result set into the onum control.
4. Link to the Database
Now, we connect the generated controls to the database query defined above. See Doc URI Wizards for help on the steps below.
- Click the Form Properties gear icon in the toolbar at the top of the form.
- In the Properties dialog box that appears, click on Document Actions. You may have to scroll to the right.
- Click on Send Data and select the ‘Manually set document URIs’ option.
- Scroll down until you see the document named ‘createOrder’, which is the data source we are interested in.
- Leave the Read URL and Method fields empty.
- Set the Write URL to: http://localhost:8082/database/BIRT/createOrder. You’ll need to change localhost:8082 to the host:port where you have installed the database connector.
- Set the Write method to POST.
- Click the Submit button.
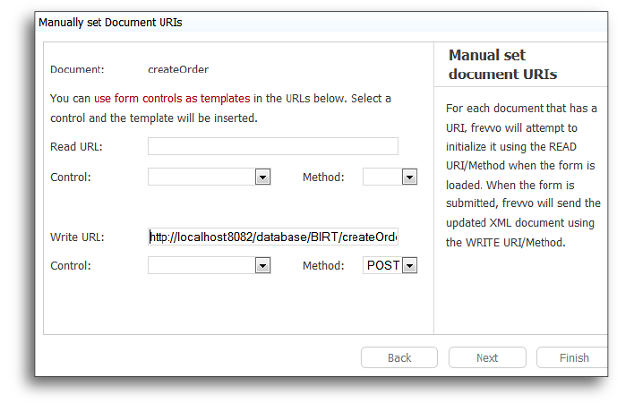
This step indicates to Live Forms that the ‘createOrder’ document is linked to the above URL via the WRITE method POST.
When the form is submitted, Live Forms will issue an HTTP POST request to the above URL sending the createOrder XML document in the payload. The database connector will map this to the <create> operation of the createOrder query that we defined above, will use the data in the XML document to resolve the query (replace {cnum} and {onum} with values from the XML) and perform the INSERT.
In other words, the data from your HTML form will save to your database.
Let’s look at a few more use cases.
Use Case: Create/Update Records
Many business problems require creating new records or updating existing records in the database. Let’s take a look at how you can create complex forms without programming using frevvo’s Database (DB) Connector.
Fair warning: this is a fairly technical topic so we’ve only touched upon the highlights here. You can explore in detail by reading the DB Connector Tutorial in the documentation.
1. Define the SQL Query
The first step is defining the query. You’ll notice that this particular query has an <update> operation in addition to the usual <retrieve> operation.
<query name="customerCreditLimit">
            <retrieve>
                <statement>
                    SELECT
                        "customerNumber" as "cnum","customerName","creditLimit"
                    FROM
                        "Customers"
                    WHERE
                        "customerNumber"={cnum}
                </statement>
            </retrieve>
            <update>
                <statement>
                    UPDATE "Customers" SET
                        "creditLimit" = {creditLimit}
                    WHERE
                        "customerNumber"={cnum}
                </statement>
            </update>
</query>
2. Generate an XML Schema
The first query is used to generate an XML schema and form controls bound to that schema. There will be two (onum and cnum). In this case, you’ll have to modify the XML a bit due to a current limitation in the DB Connector. See the documentation for detailed instructions.
3. Create the Form
Generate the form using frevvo’s no-code dynamic form builder and use the above XML schema as a data source. See Data Sources for more detailed instructions.
4. Link to the Database
Connect it to the SQL query defined above. We use Doc URI wizards, with the only change being that we configure a Write URL using HTTP POST (create) instead of a Read URL.
That’s it. When the form is submitted, frevvo will generate an XML document with values for onum and cnum and send the XML to the DB Connector. The Connector will extract onum and cnum from the XML and execute the INSERT operation.
Use Case: Insert Multiple Records
It’s easy to build on this principle to satisfy far more complex business requirements.
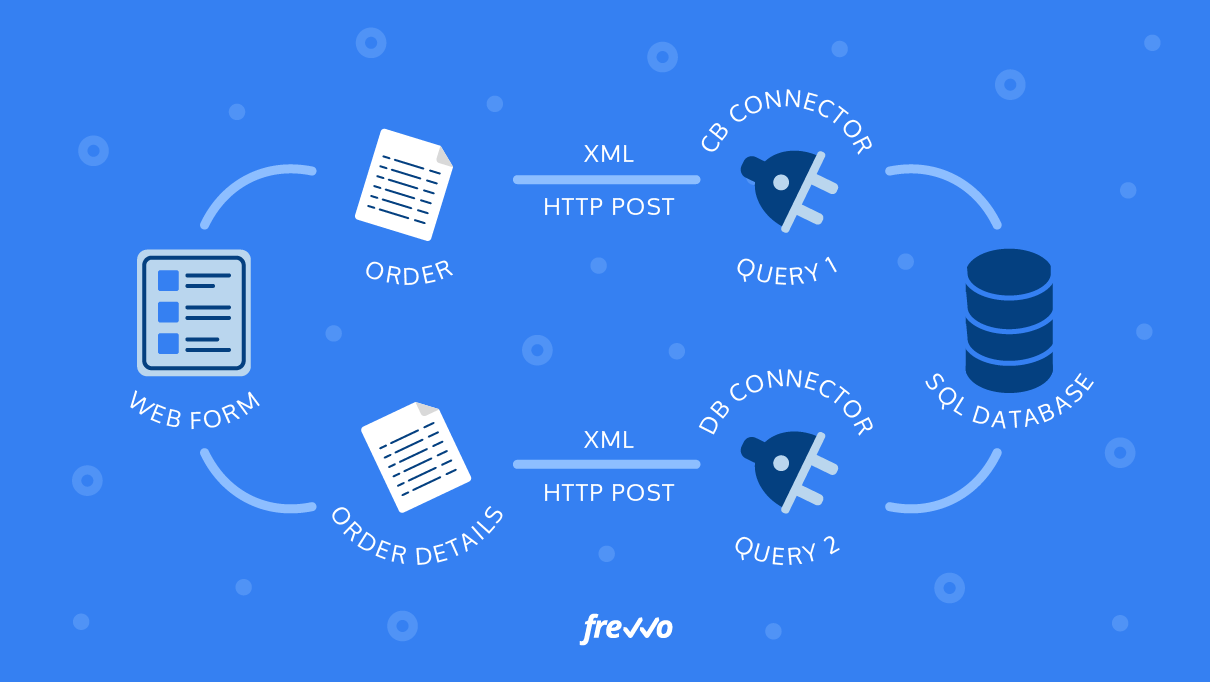
For example, in this use case, you want to insert an Order but there will also be multiple Order Line Items. This means running an INSERT for the Order itself + multiple INSERTs for the line items with different data.
Fortunately, with frevvo you can create forms with multiple Data Sources. Each one generates its own XML document and each one can have its own Doc URI.
Auto Creating Rows
You can also set up the queries so that they will first try an update and if it fails, create a new record.
<query name=”customers” autocreate=”true”>The auto create feature is particularly useful when working with Repeat Controls or Tables. With these controls, your forms can work with dynamic collections, for instance: customers, cars, addresses, dependents and others. When the user loads the form, the form may be initialized with some items.
If the user adds new items to the collection, updates a couple and submits the form, the items will be automatically added to the database and the existing ones will be updated if autocreate=true.
Auto Deleting Rows
Auto-creation raises the obvious question: What if the user deletes a row from the repeating collection described above? If you want the DB Connector to delete the corresponding records from the database, you can simply set the autodelete property and provide a key.
<query name=”customers” autocreate=”true” autodelete=”true”
 deleteKey=”customerId”>
Behind the scenes, the connector compares the items in the database with what is submitted in the form. That comparison is based on a key that you define with the attribute deleteKey (required). The deleteKey value is normally the name of the primary key in the table that contains the repeat items.
Want to connect forms to your database?
frevvo’s Database Connector makes it easy. Try frevvo free for 30 days.